Preparation works: Get a pair of scissors, pen knife and a steel ruler. Make sure they are in good condition. These are the only tools needed. Easy right?
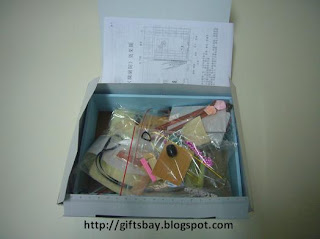
 These are the materials inside the box. It comes with a bottle of glue and a sand paper. These materials are properly divided into packets (A-D), together with a blue color frame and a board.
Packet A with materials to assemble ‘Frame’ and ‘Deck’.
Packet B with materials to assemble ‘Sliding Door’, ‘Drawing’, ‘Table’ and ‘Chair’.
Packet C with materials to assemble ‘Cupboard’.
Packet D with materials to assemble ‘Clog’, ‘Staircase’, ‘Carpet’ and ‘Vase’.
Ok , now we can start to assemble it…
LESSON 1 (Packet A)
Frame
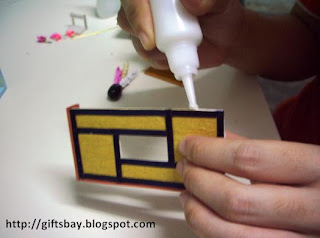
 Step 01 : Apply the glue provided all around the perimeter of the blue frame (W5).
  Step 02: Then place the board (W4) on top of it and stick them together to form a complete frame
 Step 03: Measure A01 paper to suit the size of the frame.
  Step 04: Cut out the additional A01 and then apply glue on the surface of the A01 paper.
 Step 05: Stick A01 paper on the frame
 Step 06: Repeat the same steps above to paper A02 (upper) and A03 (lower)
 Now the complete frame will look like the picture above.
Thanks for viewing and we will assemble ‘Deck’ for the next posting :)
LESSON 2 (Packet A)
Deck
 Step 01: Ensure all materials as above are ready. Get it from Packet A.

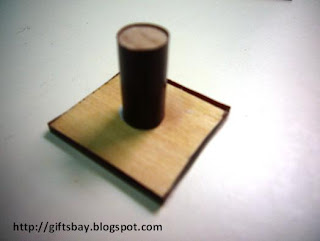
 Step 02: First, apply glue at one end of A07 and A06 and stick them together as a deck stand. Sand the end if not flat.
 Step 03: Sand A05 and A04 and glued them to become the deck surface.


 Step 04: Measure paper A08 to the deck size, cut out the additional paper and glued it on the deck surface.
 Step 05: Measure strip A09 to deck surface and stick them following the pattern above.
We are going to assemble ‘Deck’ only for today because we are quite busy. No worry, there are still plenty of picture guide ya… If got any difficulty feel free to contact us. Let’s start :)
LESSON 2 (Packet A)
Deck
Step 01: Ensure all materials as above are ready. Get it from Packet A.Step 02: First, apply glue at one end of A07 and A06 and stick them together as a deck stand. Sand the end if not flat.Step 03: Sand A05 and A04 and glued them to become the deck surface.Step 04: Measure paper A08 to the deck size, cut out the additional paper and glued it on the deck surface.Step 05: Measure strip A09 to deck surface and stick them following the pattern above. 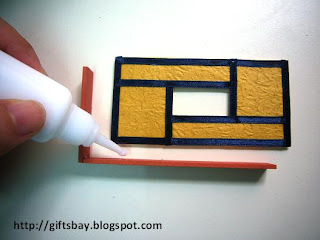 Step 06: Stick the deck surface and deck stand to complete the deck.
Now the complete deck will look like above :)
Next posting on ‘Sliding Door’, stay tuned
Next posting on ‘Sliding Door’, stay tuned
After finishing the ‘Frame’ and ‘Deck’, now its time to continue to assemble the ‘Sliding Door’. Progress is quite slow? Alright, let’s do it and try to accelerate ok…
LESSON 3 (Packet B)Sliding Door

 Step 01: Ensure all materials are ready. Get it from Packet B.
 Step 02: First, we will assemble the 3 main door frames by sticking B05, B06, B07 and B08 together. This is quite tricky as it’s not easy to stick them properly and it need patient…..
  Step 03: Measure plastic B09 to 2 front doors frame and glued it to the door frame.
  Step 04: Next, assemble B01, B02, B03, and B04 to look like picture above…
 Step 05: Stick them together with the door frames and this is what we get : )
 Since we had just finish off ‘Frame’, ‘Deck’ and ‘Sliding Door’ and there are still a lot to go , we are going to assemble ‘Drawing’, ‘Table’ and ‘Chair’ for coming post : )
Now, we are going to assemble ‘Drawing’, ‘Table’ and ‘Chair’
LESSON 4 (Packet B)
Drawing, Table and Chair
LESSON 4 (Packet B)
Drawing, Table and Chair
Drawing
 Step 01: Get all materials to assemble ‘Drawing’ from Packet B.
 Step 02: First, we will assemble the frame by sticking 4 pieces of B011 together.
Step 03: Measure B10 to the frame size and glued it to the frame.
 Step 04: Next, cut out 2 leaves from B14
Step 05: Glued the leaves and flowers together with the frame and the ‘Drawing’ is ready : )
Table

Step 01: Prepare all materials to assemble ‘Table’ from Packet B.


Step 02: Measure paper B17 (sticker) to table top, B15 and table stand, B16. Cut it out and stick it to the table top and stand.
Step 03: Apply glue at one end of B16 and stick it to the lower B15 and leave it for about 3 minutes to dry

 Step 04: Next, assemble the teapot by sticking B18, B19 and B20 together
 Step 05: Measure B22 and glue B21 on the surface of B22
 Chair
 Step 01: Prepare all materials to assemble ‘Chair’ from Packet B.
 Step 02: Measure paper B26 to the size of B23 and B25 and glued it
 Step 03: Assemble the chair by sticking B23, B24 and B25 together
  Step 04: Finally, the ‘Table’ with teapot and ‘Chair’ is ready as above
Coming up next post is ‘Cupboard’ : )
Slow updating for this post since we are quite busy preparing for the GiftsBay’s Cute Babes Pageant 2009. Remember to check it out ya…OK, let’s continue to assemble the ‘Cupboard’
LESSON 5 (Packet C)
Cupboard
LESSON 5 (Packet C)
Cupboard


Step 01: Ensure all materials are ready and get it from Packet C.


Step 02: We will assemble the 3 main ‘Cupboard’ frames. Main cupboard made up of C07, C08 and C09. The shorter horizontal cupboard is made up of C01 and 3 pieces of C02 while the last cupboard is made up of C04 and 3 pieces of C03.

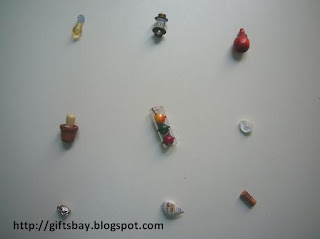
Step 03: Next, arrange the ornaments material and assemble them as picture above.

 Step 04: Stick C10 at the longer cupboard side and C11 at the shorter cupboard side.
Step 05: Glued all the ornaments accordingly and stick the cupboard decorative, C05 and C06 as above.

Step 06: Complete ‘Cupboard’ will look like above :)
Next posting is to assemble ‘Clog’, ‘Staircase’, ‘Carpet’ and ‘Vase’.
We are going to assemble ‘Clog’, ‘Staircase’, ‘Carpet’ and ‘Vase’ for this postingLESSON 6 (Packet D)
Clog, Staircase, Carpet and Vase

Step 01: Ensure all materials are ready and get it from Packet D.


Step 02: First, we will assemble clog. Sand all the edge of both D03 and glued D04 to it and the clog will look like above.


Step 03: Next, stick D06 to D05 to make the staircase. Cut out any additional D06 paper.

 Step 04: For carpet, cut two pieces of D01 (1cm by 1cm) and stick it on D02 (2cm by 2cm).


Step 05: Twist D10 and then put into the D07 vase together with D08 and D09
Now we have finished with all the packet and next final posting will arranged them into the frame :)We are going to assemble a complete set of Orchis Pavilion for this posting
LESSON 7
Final assemble

Step 01: Ready the Frame and glue the Deck to the right.


Step 02: Then, stick Table and Chair to the Deck.

Step 03: Glue Drawing to the Frame wall (adjust appropriately)


Step 04: For Sliding Door, apply glue to top, bottom, left and right edge and stick it to right of the Frame


Step 05: Next, glue the Cupboard to left and hold it to ensure it stick properly.


Step 06: Then, glue the Staircase, Vase and Carpet as above.
Step 07: Finally, the completed Orchis Pavilion :)
Thank you!!!